Construct an environment to implement the tutorial with the following flow.
Creating a project
At first, use mvn archetype:generate of Maven Archetype Plugin and create a project.
A procedure to create a project by using Windows command prompt.
For details of how to create a project by using mvn archetype:generate, refer Create a project.
|
Through proxy server
If it is necessary to go through proxy server for connecting to internet, use Proxy settings of STS, and Proxy settings of Maven. |
Execute following command in the directory wherein a project is created.
C:\xxx>mvn archetype:generate ^
  -DarchetypeGroupId=org.terasoluna.batch ^
  -DarchetypeArtifactId=terasoluna-batch-archetype ^
  -DarchetypeVersion=5.0.1.RELEASE
Set interactively as shown below.
| Item name | Setting example |
|---|---|
groupId |
org.terasoluna.batch |
artifactId |
terasoluna-batch-tutorial |
version |
1.0.0-SNAPSHOT |
package |
org.terasoluna.batch.tutorial |
Verify that "BUILD SUCCESS" is displayed for mvn command as shown below.
C:\xxx>mvn archetype:generate -DarchetypeGroupId=org.terasoluna.batch -Darchetyp
eArtifactId=terasoluna-batch-archetype -DarchetypeVersion=5.0.1.RELEASE
[INFO] Scanning for projects...
[INFO]
[INFO] ------------------------------------------------------------------------
[INFO] Building Maven Stub Project (No POM) 1
[INFO] ------------------------------------------------------------------------

(.. omitted)

Define value for property 'groupId': org.terasoluna.batch
Define value for property 'artifactId': terasoluna-batch-tutorial
Define value for property 'version' 1.0-SNAPSHOT: : 1.0.0-SNAPSHOT
Define value for property 'package' org.terasoluna.batch: : org.terasoluna.batch
.tutorial
Confirm properties configuration:
groupId: org.terasoluna.batch
artifactId: terasoluna-batch-tutorial
version: 1.0.0-SNAPSHOT
package: org.terasoluna.batch.tutorial
 Y: : y
[INFO] -------------------------------------------------------------------------
---
[INFO] Using following parameters for creating project from Archetype: terasolun
a-batch-archetype:5.0.1.RELEASE
[INFO] -------------------------------------------------------------------------
---
[INFO] Parameter: groupId, Value: org.terasoluna.batch
[INFO] Parameter: artifactId, Value: terasoluna-batch-tutorial
[INFO] Parameter: version, Value: 1.0.0-SNAPSHOT
[INFO] Parameter: package, Value: org.terasoluna.batch.tutorial
[INFO] Parameter: packageInPathFormat, Value: org/terasoluna/batch/tutorial
[INFO] Parameter: package, Value: org.terasoluna.batch.tutorial
[INFO] Parameter: version, Value: 1.0.0-SNAPSHOT
[INFO] Parameter: groupId, Value: org.terasoluna.batch
[INFO] Parameter: artifactId, Value: terasoluna-batch-tutorial
[INFO] Project created from Archetype in dir: C:\xxx\terasoluna-batch-tutorial
[INFO] ------------------------------------------------------------------------
[INFO] BUILD SUCCESS
[INFO] ------------------------------------------------------------------------
[INFO] Total time: 45.293 s
[INFO] Finished at: 2017-08-22T09:03:01+09:00
[INFO] Final Memory: 16M/197M
[INFO] ------------------------------------------------------------------------
Execute sample job and verify that the project was created successfully.
C:\xxx>cd terasoluna-batch-tutorial
C:\xxx>mvn clean dependency:copy-dependencies -DoutputDirectory=lib package
C:\xxx>java -cp "lib/*;target/*" ^
org.springframework.batch.core.launch.support.CommandLineJobRunner ^
META-INF/jobs/job01.xml job01
Verify that "BUILD SUCCESS" is displayed for mvn command and "COMPLETED" is displayed for java command, as shown below.
C:\xxx>cd terasoluna-batch-tutorial

C:\xxx\terasoluna-batch-tutorial>mvn clean dependency:copy-dependencies -Doutput
Directory=lib package
[INFO] Scanning for projects...
[INFO]
[INFO] ------------------------------------------------------------------------
[INFO] Building TERASOLUNA Batch Framework for Java (5.x) Blank Project 1.0.0-SN
APSHOT
[INFO] ------------------------------------------------------------------------

(.. omitted)

[INFO] ------------------------------------------------------------------------
[INFO] BUILD SUCCESS
[INFO] ------------------------------------------------------------------------
[INFO] Total time: 9.462 s
[INFO] Finished at: 2017-08-22T09:12:22+09:00
[INFO] Final Memory: 26M/211M
[INFO] ------------------------------------------------------------------------

C:\xxx\terasoluna-batch-tutorial>java -cp "lib/*;target/*" org.springframework.b
atch.core.launch.support.CommandLineJobRunner META-INF/jobs/job01.xml job01
[2017/08/22 09:17:32] [main] [o.s.c.s.ClassPathXmlApplicationContext] [INFO ] Re
freshing org.springframework.context.support.ClassPathXmlApplicationContext@6204
3840: startup date [Tue Aug 22 09:17:32 JST 2017]; root of context hierarchy

(.. ommited)

[2017/08/22 09:17:35] [main] [o.s.b.c.l.s.SimpleJobLauncher] [INFO ] Job: [FlowJ
ob: [name=job01]] launched with the following parameters: [{jsr_batch_run_id=1}]

[2017/08/22 09:17:35] [main] [o.s.b.c.j.SimpleStepHandler] [INFO ] Executing ste
p: [job01.step01]
[2017/08/22 09:17:35] [main] [o.s.b.c.l.s.SimpleJobLauncher] [INFO ] Job: [FlowJ
ob: [name=job01]] completed with the following parameters: [{jsr_batch_run_id=1}
] and the following status: [COMPLETED]
[2017/08/22 09:17:35] [main] [o.s.c.s.ClassPathXmlApplicationContext] [INFO ] Cl
osing org.springframework.context.support.ClassPathXmlApplicationContext@6204384
0: startup date [Tue Aug 22 09:17:32 JST 2017]; root of context hierarchy
Import project
Import a created project to STS.
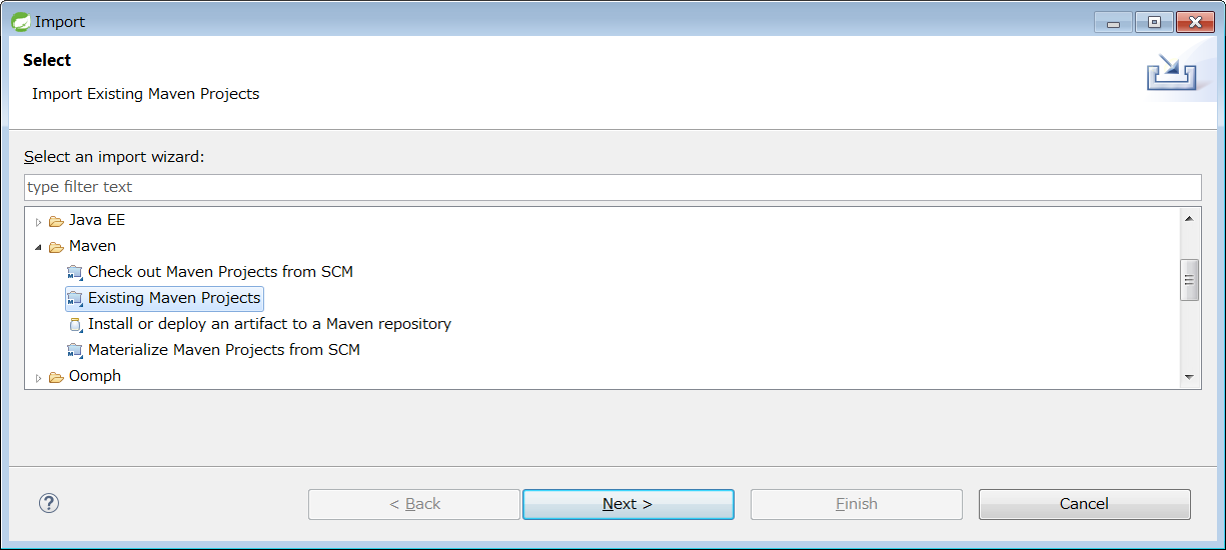
Select [File] → [Import] → [Maven] → [Existing Maven Projects] → [Next] from STS menu and select a project created by archetype.
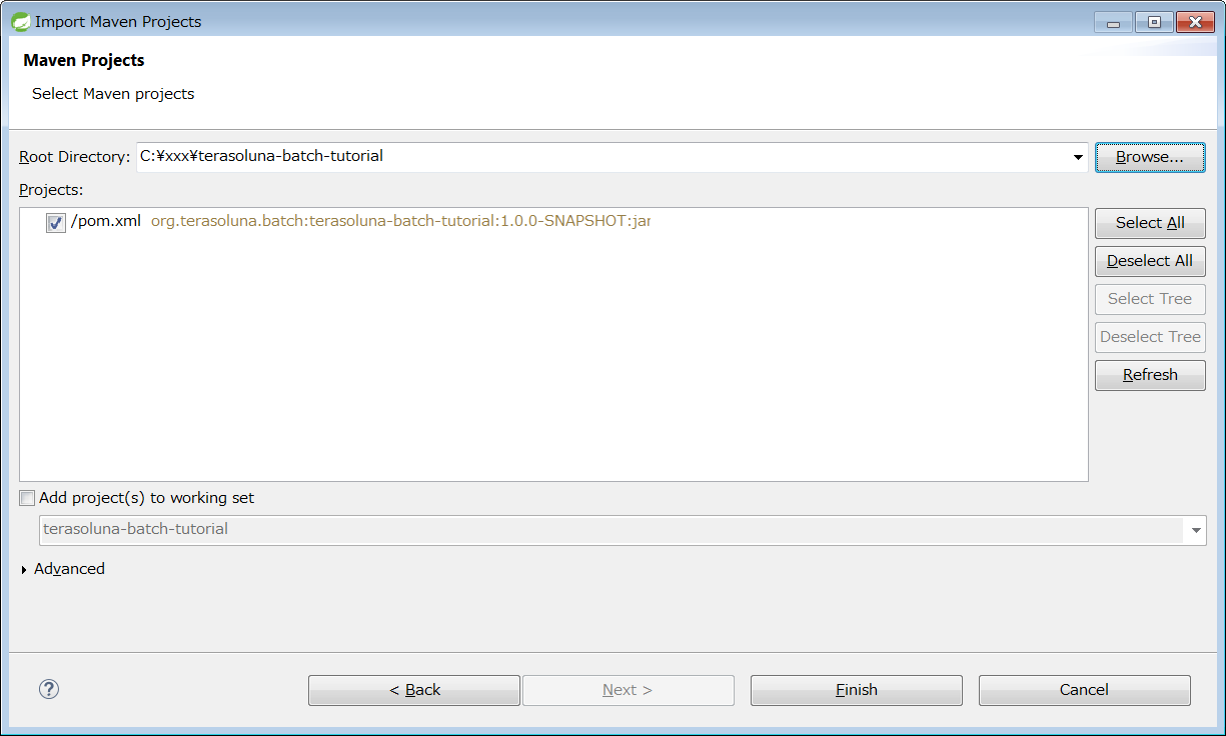
Set C:\xxx\terasoluna-batch-tutorial in Root Directory and press [Finish] when pom.xml of org.terasoluna.batch is selected in Projects.
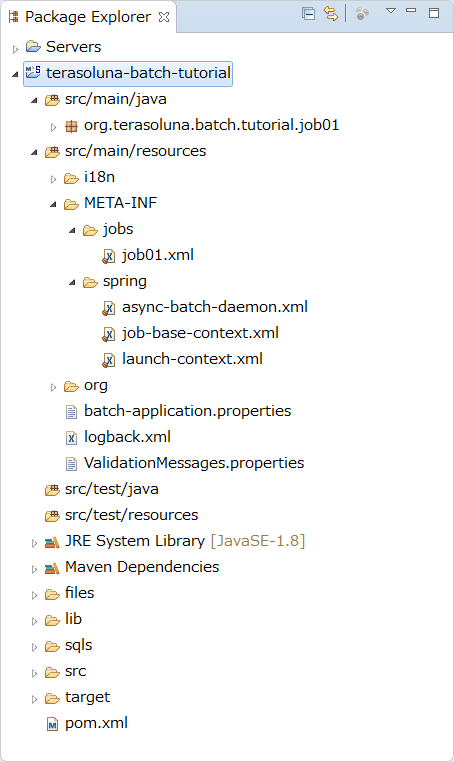
When the import is complete, the following project is displayed as below in the Package Explorer.
|
When a build error occurs after import
When a build error occurs after import, right click project name, click "Maven" → "Update Project…", click "OK" to resolve the error. |
|
Setting display format for the package
Display format of the package is "Flat" by default, but it should be set to "Hierarchical". |
Build project
For project structure, refer Project structure.
Verify / edit setup file
Verify setup file
A majority of the settings like Spring Batch and MyBatis are already configured in the created project.
For setting file of created project, refer Build project.
|
Customizing setting value
When implementing the tutorial, you do not need to understand the setting values that need customization according to user’s situation. However, you should read it before or after you perform the tutorial. For details, refer Settings for whole application. |
Editing setting file
Change setting of H2 Database for implementing the tutorial. Changes in the setting are shown below.
-
It is possible to connect to database from processes of multiple batch applications without manually starting the server.
-
It is possible to connect to database when the data is retained even after terminating batch application processes.
Note that, refer Features of H2 official document for details of H2 Database settings.
Basic details of editing are shown below.
Open batch-application.properties and edit admin.jdbc.url and jdbc.url as shown below.
Only the lines to be edited are described here for the sake of clarity in the example below, a new line is added after comment out instead of overwriting.
##  Application settings.

# Admin DataSource settings.
#admin.jdbc.url=jdbc:h2:mem:batch-admin;DB_CLOSE_DELAY=-1
admin.jdbc.url=jdbc:h2:~/batch-admin;AUTO_SERVER=TRUE

# Job DataSource settings.
#jdbc.url=jdbc:h2:mem:batch;DB_CLOSE_DELAY=-1
jdbc.url=jdbc:h2:~/batch-admin;AUTO_SERVER=TRUE|
Reasons for specifying same database name (batch-admin) for admin.jdbc.url and jdbc.url
Same database name is specified for As described in Settings of overall application, Originally, it is preferable to separate databases used by FW and individual jobs. |
Preparation of input data
Input data of jobs which inputs or outputs data by accessing database
Prepare input data to be used in A job which inputs or outputs data by accessing database.
Note that, implementation is not required when a job which inputs or outputs data by accessing database is not be to created.
Preparation of input data is shown with the following flow.
Execute a script at the time of job execution (while generating ApplicationContext) and initialize database by applying these settings.
Create table and initial data insertion script
Create table and initial data insertion script.
Create a sqls directory in the project root directory and store following 3 scripts.
-
A script to create a table (
create-member-info-table.sql) -
A script to insert initial data (normal) (
insert-member-info-data.sql) -
A script to insert initial data (abnormal) (
insert-member-info-error-data.sql)
Contents of the file to be created are shown below.
CREATE TABLE IF NOT EXISTS member_info (
    id CHAR(8),
    type CHAR(1),
    status CHAR(1),
    point INT,
    PRIMARY KEY(id)
);TRUNCATE TABLE member_info;
INSERT INTO member_info (id, type, status, point) VALUES ('00000001', 'G', '1', 0);
INSERT INTO member_info (id, type, status, point) VALUES ('00000002', 'N', '1', 0);
INSERT INTO member_info (id, type, status, point) VALUES ('00000003', 'G', '0', 10);
INSERT INTO member_info (id, type, status, point) VALUES ('00000004', 'N', '0', 10);
INSERT INTO member_info (id, type, status, point) VALUES ('00000005', 'G', '1', 100);
INSERT INTO member_info (id, type, status, point) VALUES ('00000006', 'N', '1', 100);
INSERT INTO member_info (id, type, status, point) VALUES ('00000007', 'G', '0', 1000);
INSERT INTO member_info (id, type, status, point) VALUES ('00000008', 'N', '0', 1000);
INSERT INTO member_info (id, type, status, point) VALUES ('00000009', 'G', '1', 10000);
INSERT INTO member_info (id, type, status, point) VALUES ('00000010', 'N', '1', 10000);
INSERT INTO member_info (id, type, status, point) VALUES ('00000011', 'G', '0', 100000);
INSERT INTO member_info (id, type, status, point) VALUES ('00000012', 'N', '0', 100000);
INSERT INTO member_info (id, type, status, point) VALUES ('00000013', 'G', '1', 999901);
INSERT INTO member_info (id, type, status, point) VALUES ('00000014', 'N', '1', 999991);
INSERT INTO member_info (id, type, status, point) VALUES ('00000015', 'G', '0', 999900);
INSERT INTO member_info (id, type, status, point) VALUES ('00000016', 'N', '0', 999990);
INSERT INTO member_info (id, type, status, point) VALUES ('00000017', 'G', '1', 10);
INSERT INTO member_info (id, type, status, point) VALUES ('00000018', 'N', '1', 10);
INSERT INTO member_info (id, type, status, point) VALUES ('00000019', 'G', '0', 100);
INSERT INTO member_info (id, type, status, point) VALUES ('00000020', 'N', '0', 100);
INSERT INTO member_info (id, type, status, point) VALUES ('00000021', 'G', '1', 1000);
INSERT INTO member_info (id, type, status, point) VALUES ('00000022', 'N', '1', 1000);
INSERT INTO member_info (id, type, status, point) VALUES ('00000023', 'G', '0', 10000);
INSERT INTO member_info (id, type, status, point) VALUES ('00000024', 'N', '0', 10000);
INSERT INTO member_info (id, type, status, point) VALUES ('00000025', 'G', '1', 100000);
INSERT INTO member_info (id, type, status, point) VALUES ('00000026', 'N', '1', 100000);
INSERT INTO member_info (id, type, status, point) VALUES ('00000027', 'G', '0', 1000000);
INSERT INTO member_info (id, type, status, point) VALUES ('00000028', 'N', '0', 1000000);
INSERT INTO member_info (id, type, status, point) VALUES ('00000029', 'G', '1', 999899);
INSERT INTO member_info (id, type, status, point) VALUES ('00000030', 'N', '1', 999989);
COMMIT;TRUNCATE TABLE member_info;
INSERT INTO member_info (id, type, status, point) VALUES ('00000001', 'G', '0', 0);
INSERT INTO member_info (id, type, status, point) VALUES ('00000002', 'N', '0', 0);
INSERT INTO member_info (id, type, status, point) VALUES ('00000003', 'G', '1', 10);
INSERT INTO member_info (id, type, status, point) VALUES ('00000004', 'N', '1', 10);
INSERT INTO member_info (id, type, status, point) VALUES ('00000005', 'G', '0', 100);
INSERT INTO member_info (id, type, status, point) VALUES ('00000006', 'N', '0', 100);
INSERT INTO member_info (id, type, status, point) VALUES ('00000007', 'G', '1', 1000);
INSERT INTO member_info (id, type, status, point) VALUES ('00000008', 'N', '1', 1000);
INSERT INTO member_info (id, type, status, point) VALUES ('00000009', 'G', '0', 10000);
INSERT INTO member_info (id, type, status, point) VALUES ('00000010', 'N', '0', 10000);
INSERT INTO member_info (id, type, status, point) VALUES ('00000011', 'G', '1', 100000);
INSERT INTO member_info (id, type, status, point) VALUES ('00000012', 'N', '1', 100000);
INSERT INTO member_info (id, type, status, point) VALUES ('00000013', 'G', '1', 1000001);
INSERT INTO member_info (id, type, status, point) VALUES ('00000014', 'N', '1', 999991);
INSERT INTO member_info (id, type, status, point) VALUES ('00000015', 'G', '1', 999901);
COMMIT;Adding settings which executes script automatically while executing a job
Execute a script while executing a job (while generating ApplicationContext) and add definition of <jdbc:initialize-database> tag to initialize database.
Edit following 2 files.
-
Add path setting for script to be executed in batch-application.properties
-
Add definition of
<jdbc:initialize-database>tag in launch-context.xml
Specific setting details are shown below.
Open batch-application.properties and add path settings of script to be executed in the end.
-
tutorial.create-table.script(A path for a script to create a table)
-
tutorial.insert-data.script(A path for a script to insert initial data)
Normal data and abnormal data are defined with the same property name to enable easy change of script to be executed, for the path of initial data insertion script, and commented out.
# Database Initialize
tutorial.create-table.script=file:sqls/create-member-info-table.sql
tutorial.insert-data.script=file:sqls/insert-member-info-data.sql
#tutorial.insert-data.script=file:sqls/insert-member-info-error-data.sql
Open launch-context.xml, and add definition of <jdbc:initialize-database> tag, in <beans> tag.
<!-- database initialize definition -->
<jdbc:initialize-database data-source="jobDataSource" enabled="${data-source.initialize.enabled:false}" ignore-failures="ALL">
    <jdbc:script location="${tutorial.create-table.script}" />
    <jdbc:script location="${tutorial.insert-data.script}" />
</jdbc:initialize-database>
Input data for a job which inputs or outputs data by accessing the file
Prepare input data to be used in A job which inputs or outputs data by accessing a file.
Note that, the implementation is not required when a job which inputs or outputs data by accessing a file is not created.
A storage directory is created for input and output files, and an input file is created for preparation of input data.
Create following 2 directories to store input / output files in the project root directory.
-
files/input -
files/output
Create following 2 files under files/input.
-
Normal data input file (
input-member-info-data.csv) -
Abnormal data input file (
input-member-info-error-data.csv)
Store input file with following details in created input file storage directory.
Contents of the file to be created are as below.
00000001,G,1,0
00000002,N,1,0
00000003,G,0,10
00000004,N,0,10
00000005,G,1,100
00000006,N,1,100
00000007,G,0,1000
00000008,N,0,1000
00000009,G,1,10000
00000010,N,1,10000
00000011,G,0,100000
00000012,N,0,100000
00000013,G,1,999901
00000014,N,1,999991
00000015,G,0,999900
00000016,N,0,999990
00000017,G,1,10
00000018,N,1,10
00000019,G,0,100
00000020,N,0,100
00000021,G,1,1000
00000022,N,1,1000
00000023,G,0,10000
00000024,N,0,10000
00000025,G,1,100000
00000026,N,1,100000
00000027,G,0,1000000
00000028,N,0,1000000
00000029,G,1,999899
00000030,N,1,99998900000001,G,0,0
00000002,N,0,0
00000003,G,1,10
00000004,N,1,10
00000005,G,0,100
00000006,N,0,100
00000007,G,1,1000
00000008,N,1,1000
00000009,G,0,10000
00000010,N,0,10000
00000011,G,1,100000
00000012,N,1,100000
00000013,G,1,1000001
00000014,N,1,999991
00000015,G,1,999901Preparation to refer database from STS
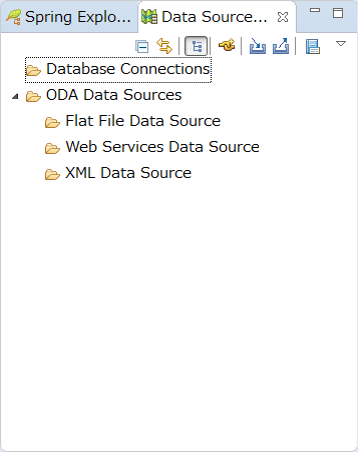
Since Data Source Explorer is used to refer database in this tutorial, configure Data Source Explorer.
Database can be referred and SQL can be executed on STS by using Data Source Explorer.
Database targets to be referred in the tutorial are as shown below.
-
Data for managing batch applications execution results and status persisting in JobRepository
-
Data which uses A job which inputs or outputs data by accessing database
At first, display Data Source Explorer View.
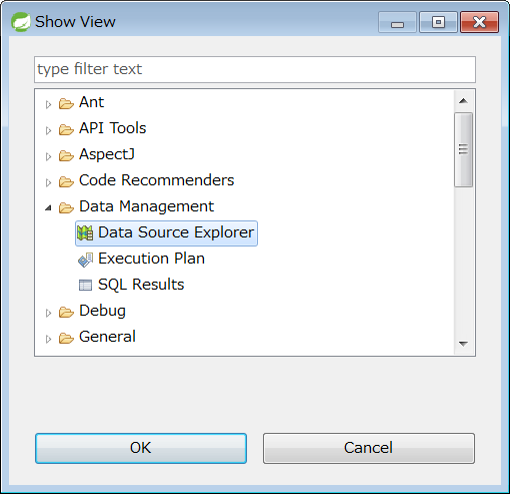
Select [Window] → [Show View] → [Other…] from STS menu and press [OK] when Data Source Explorer is selected under Data Source Management.
Data Source Explorer View is displayed on the workbench.
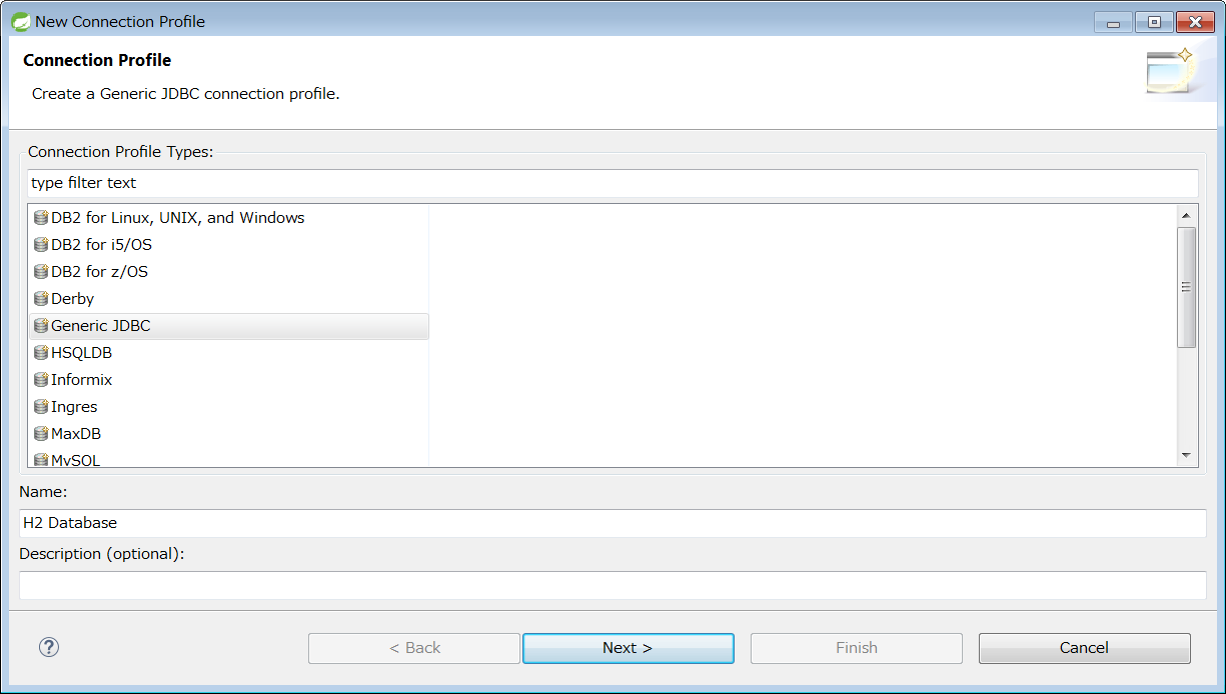
Next, create a ConnectionProfile to connect to a database.
Right-click Database Connection of Data Source Explorer View, press [New…] and display Connection Profile.
Then, select Generic JDBC, and click [Next] when H2 Database is entered in Name.
(Any value can be entered in Name.)
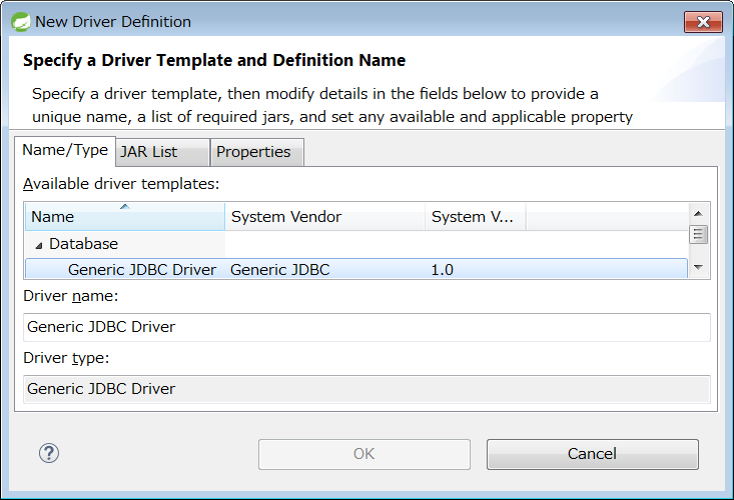
Since Driver is not configured in the initial state, add a Driver to connect to H2 Database.
Click New Driver Definition button on the right side of Drivers drop down list, and display definition window of Driver.
Select Generic JDBC driver under Available driver templates, of Name/Type tab.
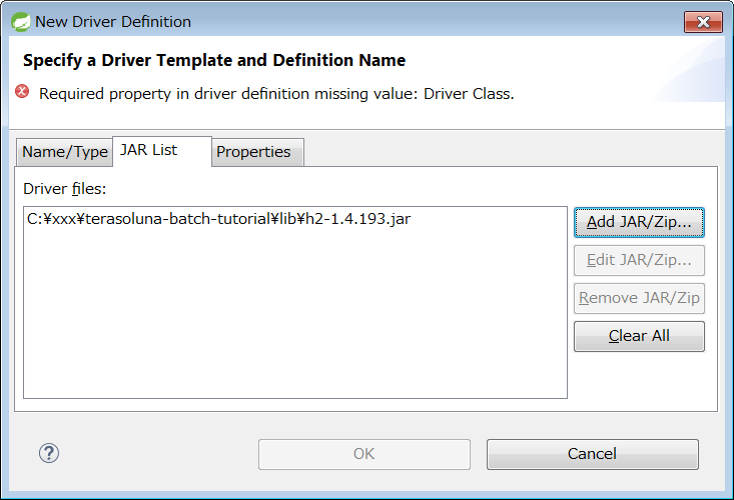
Next, open JAR List tab, click [Add Jar/Zip…], select jar file of H2 Database and click [Open].
|
A location where jar of H2 Database is stored
jar of H2 Database is stored under |
Next, open the Properties tab, set following contents, click [OK] and add Driver.
Any value can be set in Database Name. Other setting values are same as values set in batch-application.properties.
| Property | Value |
|---|---|
Connection URL |
jdbc:h2:~/batch-admin;AUTO_SERVER=TRUE |
Database Name |
terasoluna-batch-tutorial |
Driver Class |
org.h2.Driver |
User ID |
sa |
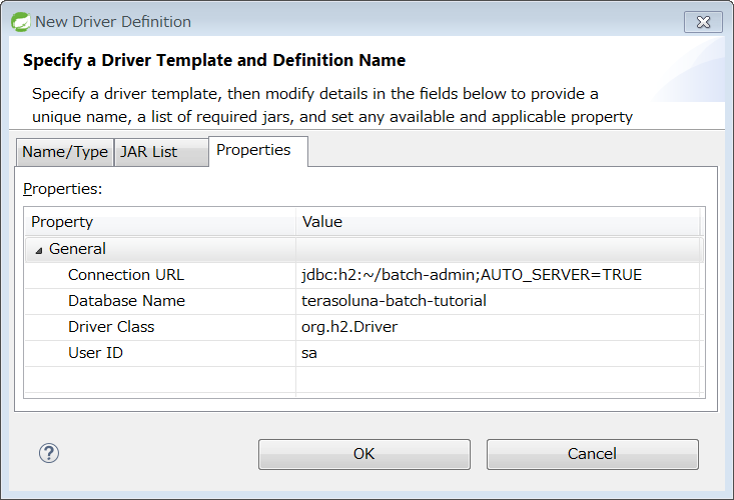
Verify that Driver is added to configured details and click [Finish].
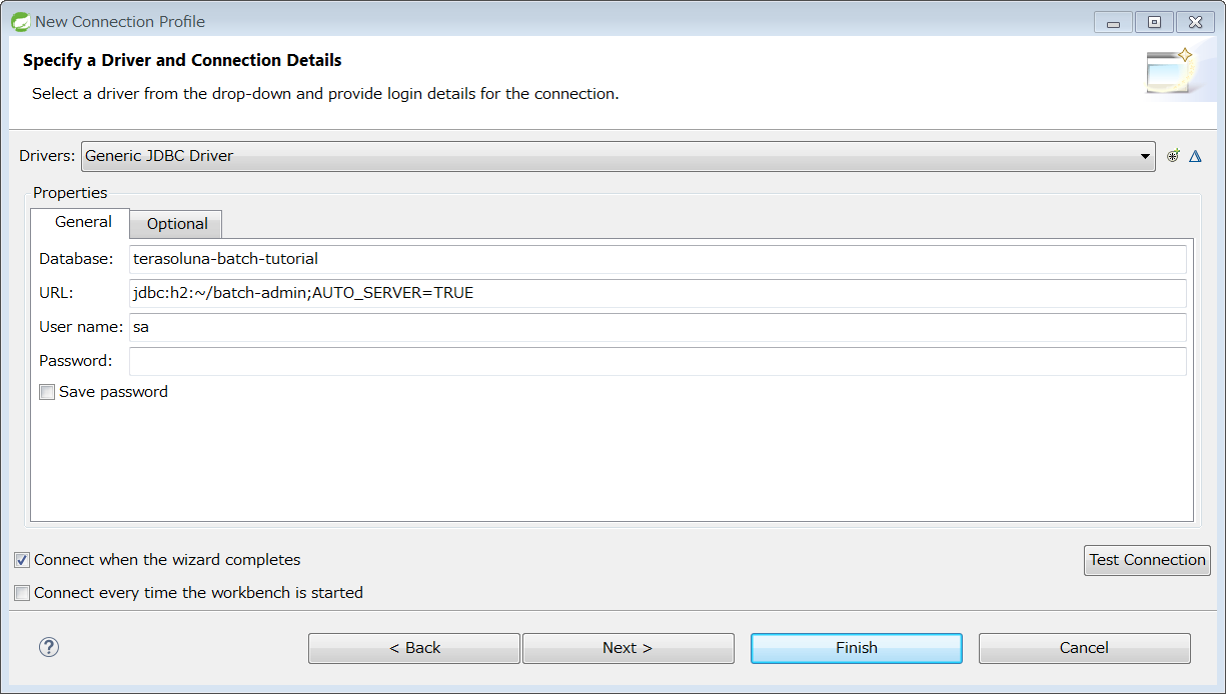
When Connection Profile is created, connection to H2 Database is displayed in Data Source Explorer View.
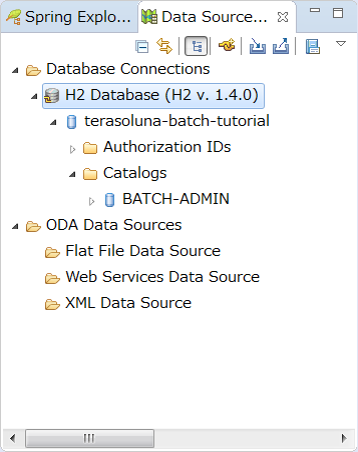
Preparation to refer database from STS is now complete.
Settings of Data Source Explorer are verified in Verify operations of project.
Verify operations of project
Procedure to verify operations of project are shown below.
Execute job in STS
Procedure to execute job in STS is shown below.
|
How to execute a job
Although the job is originally executed from a shell script, a procedure to execute the job in STS is used in the tutorial for easy explanation. |
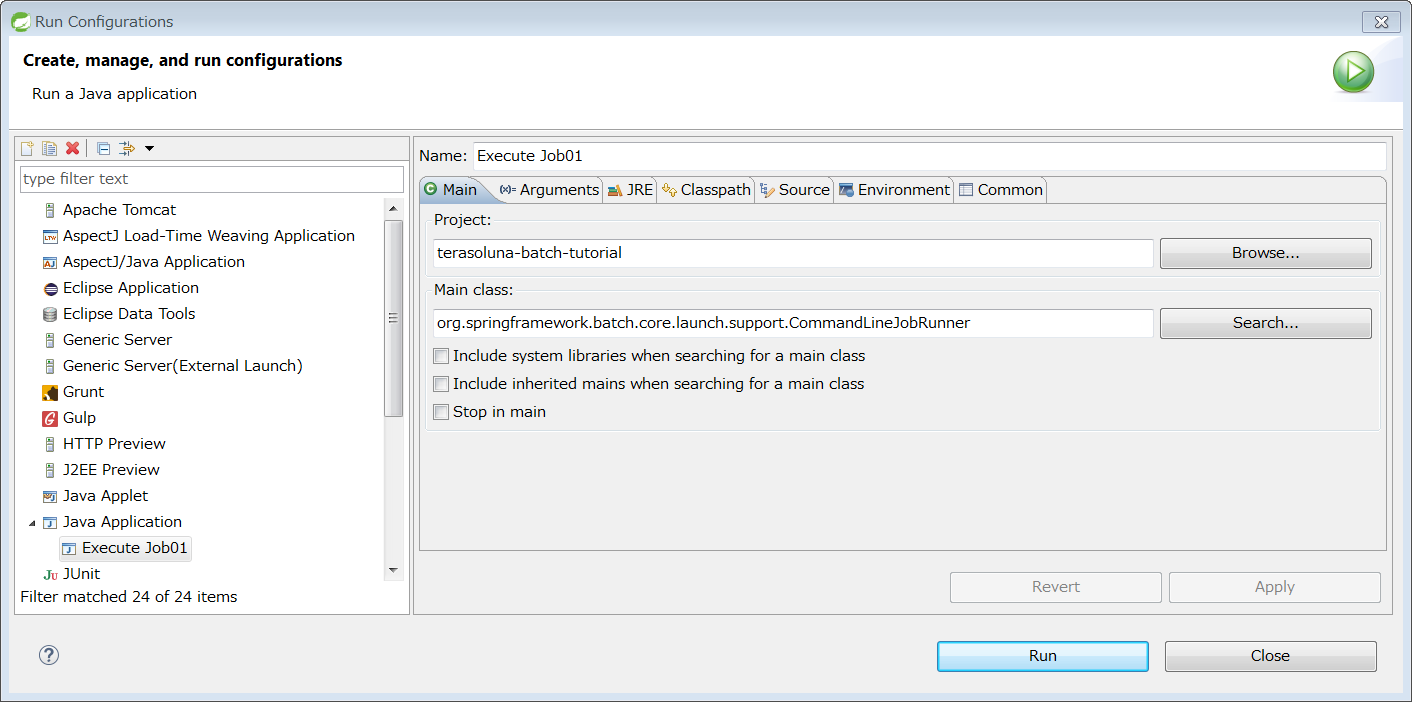
Creating Run Configuration (Execution configuration)
How to create Run Configuration (execution configuration) using execution of sample job as an example is explained.
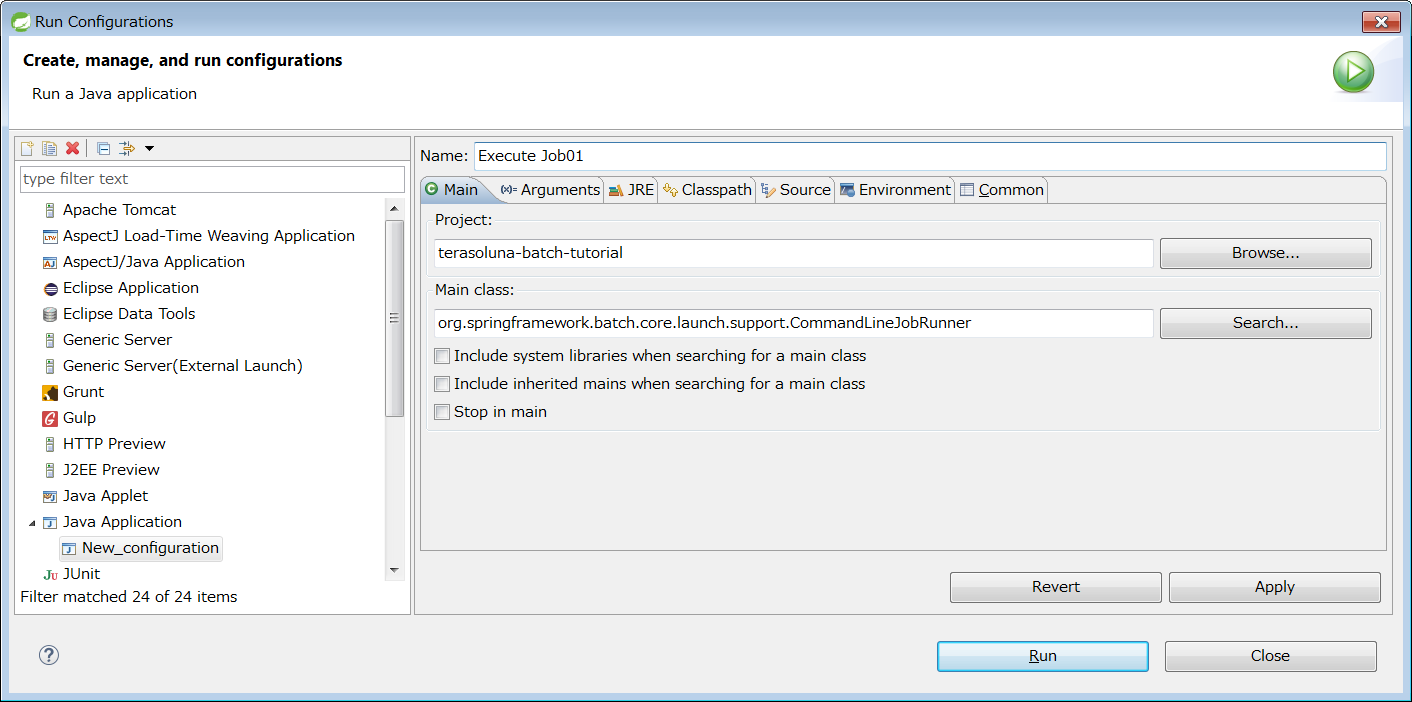
Select Java Application from STS menu - [Run] → [Run Configurations…] → List of types, right-click → select [New], display Run Configuration creation screen and set value given below.
| Item name | Value |
|---|---|
Name |
Execute Job01 |
Project |
terasoluna-batch-tutorial |
Main class |
org.springframework.batch.core.launch.support.CommandLineJobRunner |
Next, open Arguments tab and set value given below.
| Item name | Value |
|---|---|
Program arguments |
META-INF/jobs/job01.xml job01 |
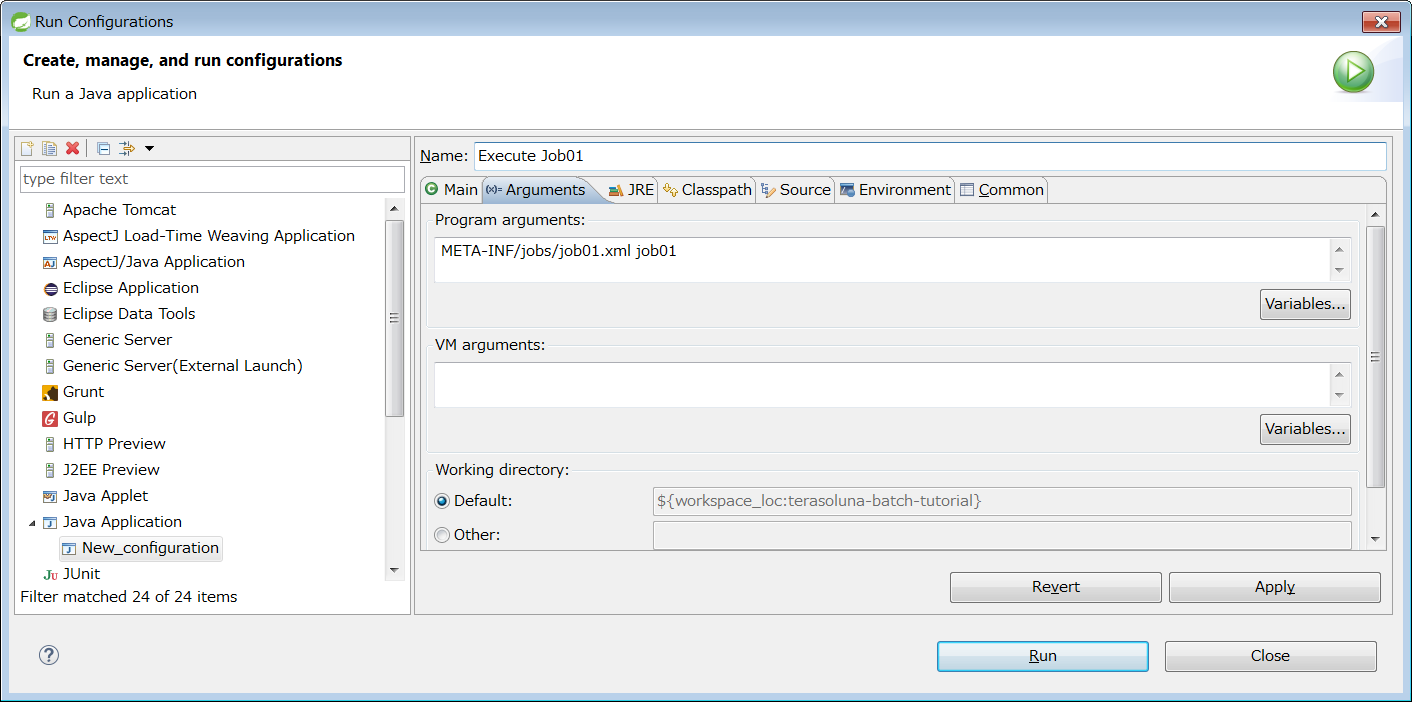
Click [Apply] when settings are completed.
|
Value to be set while creating Run Configuration
Parameters same as command for Execution of sample job (Verify that it is created successfully) are set in Run Configuration. |
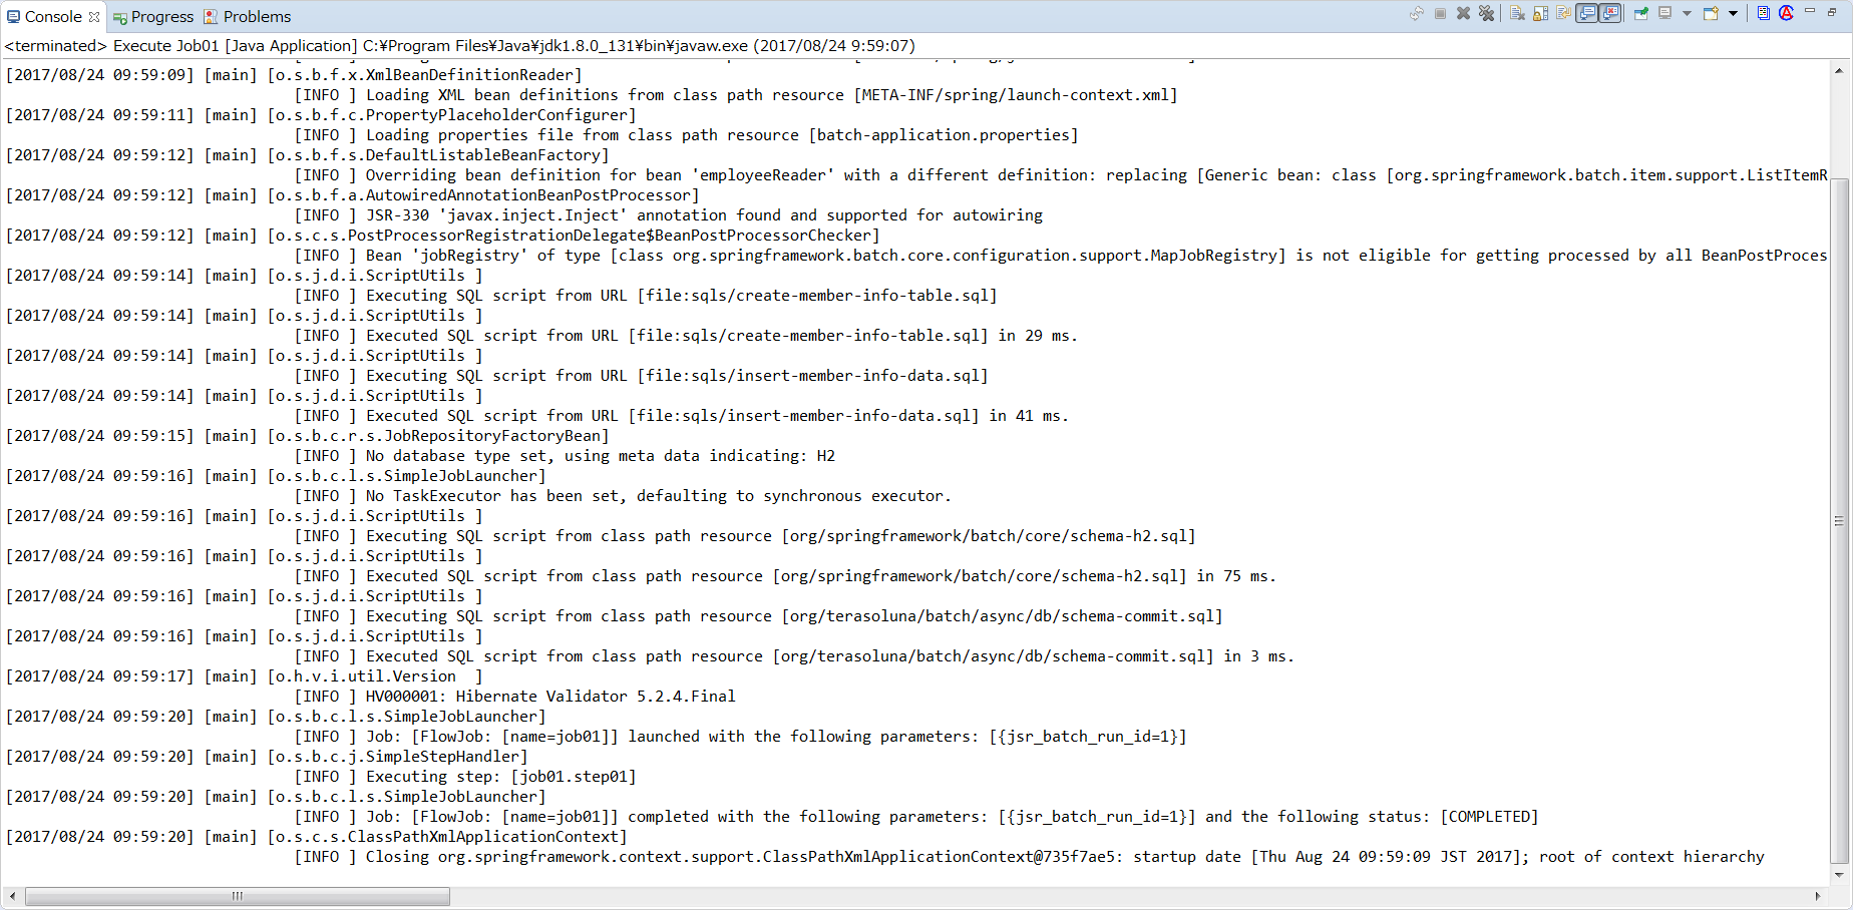
Job execution and results verification
How to verify job execution and results is explained.
Verification of execution results for the job explained here include console log verification and exit code verification for the job.
Use Debug View in this tutorial to verify exit code of job execution. How to display Debug View is subsequently explained.
|
Reasons to display Debug View
If Debug View is not displayed in STS, it is not possible to verify exit code while executing a job. |
At first, a method to execute job is explained.
Select Execute job created in Creating Run Configuration (Execution configuration) under Java Application from STS menu - [Run] → [Run Configurations…] → Type list, click [Run] to execute the job.
Verify execution results of the job in console log.
Job is executed successfully if the display is as shown below.
Next, display Debug View and verify the exit code of job execution.
Select [Window] → [Show View] → [Other…] from STS menu, and click [OK] when Debug is selected under Debug.
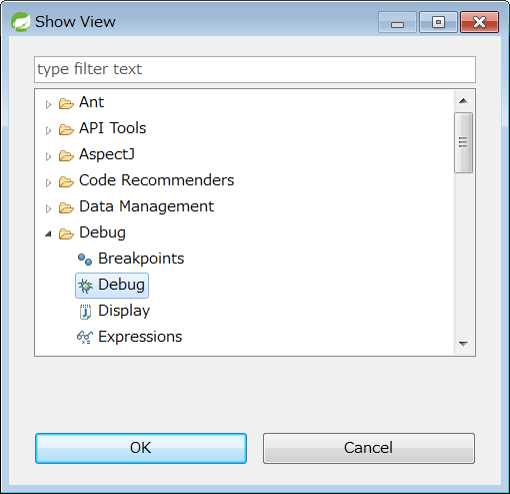
Debug is displayed on the workbench.

It can be verified that exit code of job execution is 0 by displaying <terminated, exit value: 0>.
|
When job execution fails in STS
If execution of job fails in STS even though correct source code is used, job can be executed successfully by resolving incomplete build status. Procedure is shown below. |
Refer a database by using Data Source Explorer
A method to use database by using Data Source Explorer View is explained.
List of tables can be verified by opening the database BATCH-ADMIN in Data Source Explorer in hierarchy as below.
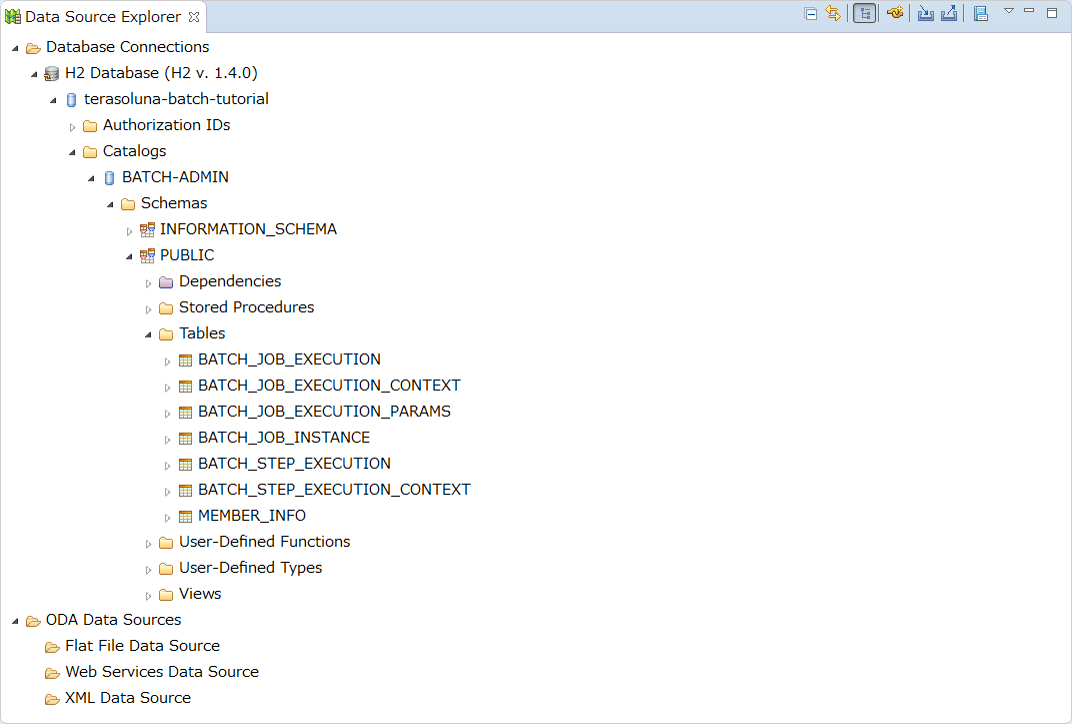
When Spring Batch metadata table (For details, refer metadata schema of JobRepository) and,
Preparation of input data for the job which inputs or outputs data by accessing a database are implemented, verify that MEMBER_INFO table is created.
Next, records stored in the table can be referred by the method given below.
Right-click the table to be referred, select [Data] → [Edit] and you can refer a record stored in the table in table format.
An example referring to BATCH_JOB_INSTANCE table is shown below.
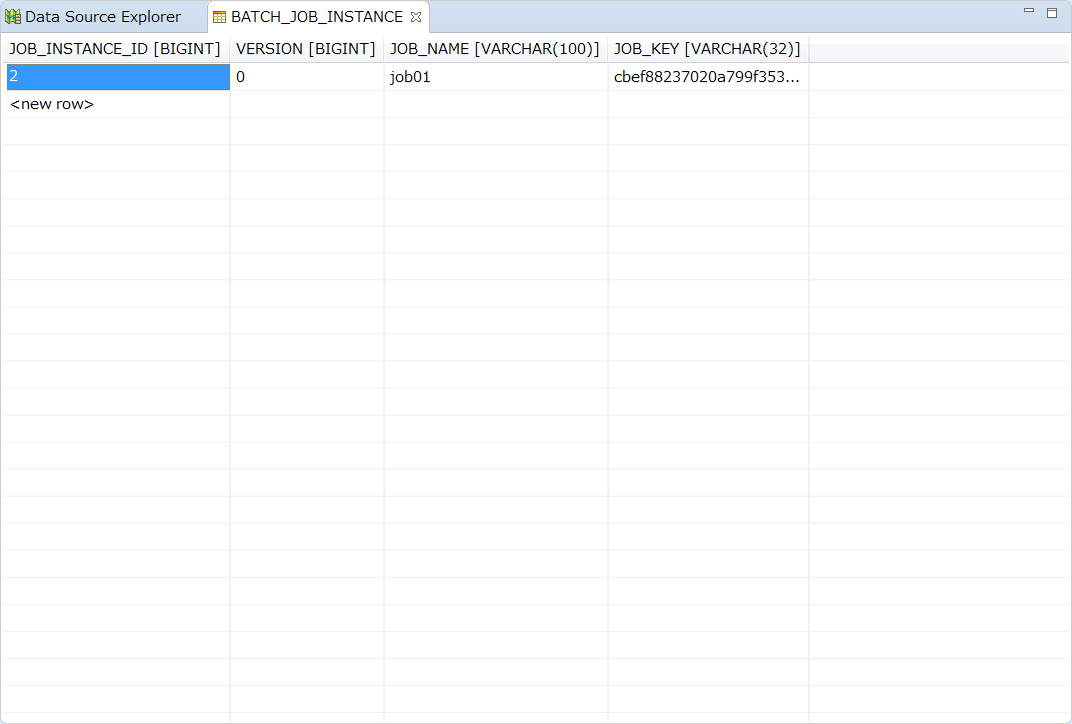
You can see that a job called job01 is executed.
Environment construction tutorial is now complete.